
Polymeric sand is the right choice for most paver installations, provided the base is dry, well-draining and sand-set with a joint depth of at least 4 centimetres. It bonds loose jointing sand into a semi-rigid fill that resists shifting, erosion and weed growth far better than plain sand. The catch is activation: applied on a wet surface or without proper compaction, it fails to cure correctly and can haze or wash out.
Table of Contents
- Why polymeric sand works: benefits and realistic limitations
- Choosing the right polymeric sand: grades, joint sizes and no-haze options
- Tools, materials and site prep checklist
- Step-by-step installation sequence homeowners can follow
- Curing, maintenance and when to reapply
- Common mistakes and how to fix them
- ProZone perspective: material selection and quality control in cold climates
- How ProZone can help: supplies, installation and free estimate
- Sources
- FAQ
Why polymeric sand works: benefits and realistic limitations
Polymeric sand is a blend of fine sand and polymer binders. When water is applied correctly, the polymers activate and form a flexible bond between sand grains inside each joint. That bond is what separates it from ordinary jointing sand, which stays loose and migrates under traffic, rain and freeze-thaw cycling.
The benefits are measurable in day-to-day performance rather than in a lab figure, but they are consistent with how the product is designed to behave.
- Joints stay filled, reducing the shifting and rocking that loose sand allows.
- Weed seeds have a harder time germinating in a bonded joint.
- Ants and other insects are less likely to burrow through hardened sand.
- The bond retains some flexibility, which helps it accommodate the paver movement typical of freeze-thaw regions.
The limitations matter just as much. Manufacturers caution that polymeric sand is not intended for submerged or constantly wet surfaces, and joints can soften when exposed to persistent humidity, though they typically re-harden once dry, according to Techniseal’s product guide. Pool edges, low spots with poor drainage and areas with standing water are poor candidates.
Choosing the right polymeric sand: grades, joint sizes and no-haze options
Product selection depends on joint width, joint depth and how the surface will be used. Getting this wrong is one of the most common reasons homeowners end up redoing the work within a season.
- Minimum joint depth for reliable bonding is 4 centimetres, per Techniseal’s EZSAND datasheet.
- Coverage varies by joint size: a 22.7 kilogram bag covers roughly 5.5 to 11 square metres for narrow joints and 2.3 to 3.7 square metres for wide joints, according to SmartSand’s coverage notes.
- High-performance and NextGel or no-haze formulas are worth the extra cost on driveways, patios and any surface where surface residue would be visible or hard to remove.
- Skip polymeric sand entirely around pool coping, low-lying drainage paths and any area that holds water after rain.
Municipal specifications reinforce these boundaries. A Halifax municipal spec excerpt requires polymeric joint sand to meet CSA A23.1:24 gradation limits and to be installed only on dry surfaces following manufacturer instructions, a standard that reflects how the material is expected to perform across Canadian climates.
Tools, materials and site prep checklist
Getting the site ready before the bag is opened prevents most of the failures homeowners run into later.
- Plate compactor fitted with a rubber protective mat, sized for residential paver work.
- Manual tamper as an alternative for small repair areas or tight corners a compactor cannot reach.
- Leaf blower to clear fine dust from joints before activation.
- Stiff push broom and a garden hose fitted with a fine shower nozzle, not a jet setting.
- A weather check confirming no rain is forecast for at least 24 hours.
Before starting, confirm the bedding layer drains properly, joints are cleared to at least 4 centimetres deep, and sand sits below the paver chamfer edge so it does not spill onto the surface during compaction.
Pro Tip: In Edmonton’s freeze-thaw climate, avoid installing when overnight temperatures are expected to drop below 0 C within 48 hours, since cold slows curing and can leave joints tacky.
Step-by-step installation sequence homeowners can follow
Once the site is prepped and dry, the sequence is straightforward, but each step depends on the one before it.
- Spread polymeric sand across the surface and sweep it into the joints with a stiff broom, working in one direction.
- Run the plate compactor over the area (with the rubber mat attached) to settle sand deep into the joints.
- Top up joints with more sand and repeat sweeping and compacting until every joint is fully packed to the paver surface.
- Use a leaf blower to remove all fine dust and surface residue before adding water, since leftover dust is a leading cause of hazing per SmartSand’s technical datasheet.
- Activate the sand with a controlled shower setting, working in small sections of about 20 square metres at a time.
- Water steadily but avoid pooling or run-off, since overwatering washes the polymers out of the joint before they can bond.
- Move to the next section only once the previous one has been evenly saturated without surface flooding.
- Allow the installation to rest undisturbed once all sections are complete.
Pro Tip: Water in overlapping passes rather than one heavy soak. It is easier to add water to a dry spot than to fix a joint that has washed out.
Restrict foot traffic for the first hour and keep vehicles off the surface until the sand has had a full curing cycle, covered in the next section.
Curing, maintenance and when to reapply
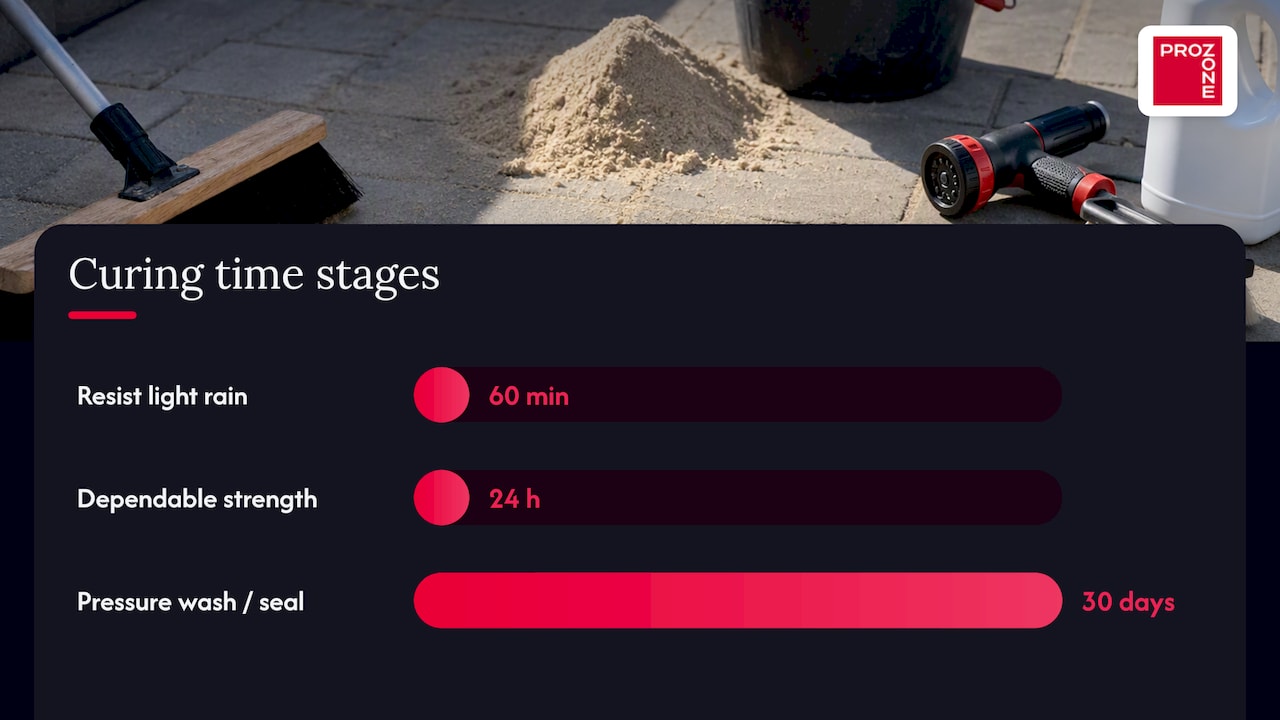
Curing happens in stages, not all at once. Polymeric sand typically needs about 60 minutes to resist a light rain and 24 hours before it reaches dependable strength, with up to 30 days recommended before pressure washing or sealing, according to Techniseal’s EZSAND datasheet.
A properly cured joint can go up to 30 days before it is ready for pressure washing or sealing, which is why patience in the first month pays off in joint longevity, per manufacturer curing guidance.
- Keep joints clear of leaves and organic debris that trap moisture against the sand.
- Avoid aggressive scrubbing or pressure washing during the cure window.
- Inspect joints each spring after freeze-thaw cycling for cracking or gaps.
- Reapply sand promptly if you see erosion channels or bare joints forming.
Common mistakes and how to fix them
Most polymeric sand failures trace back to a handful of avoidable errors.
- Haze usually comes from leftover dust on the paver surface during activation. Remove it with a damp cloth or manufacturer-approved haze remover once fully cured.
- Soft or washed-out joints typically mean the sand was overwatered or activated on a surface that was not properly compacted first.
- Repeated weed growth or excess paver movement signals the joints were never fully packed, and the fix is to remove the failed sand and reinstall following the full compaction and activation sequence.
ProZone perspective: material selection and quality control in cold climates
Manufacturer datasheets and CSA-referenced gradation standards are treated as the baseline, not a suggestion, especially in a freeze-thaw climate where shortcuts show up fast. New products should be tested on a small section before committing to a full driveway. Quality washed sands and compaction equipment matter more here than in milder regions, because a poorly bonded joint will fail its first winter, not its fifth.
— ProZone
How ProZone can help: supplies, installation and free estimate
If the prep work above sounds like more than you want to manage on a weekend, ProZone supplies the materials and the crews to do it right the first time. We stock washed sand and Hawaiian sand for bedding layers, along with Barkman Concrete products, aggregates and related landscaping supplies through our landscape supplies centre.
For larger paver areas, parking surfaces or commercial properties, our trained crews bring plate compactors and follow manufacturer and Alberta Safety Codes requirements on every job, so joints are compacted and activated correctly the first time rather than redone the following spring. We offer free on-site consultations within 100 km.
Reach out through our online contact form or call ProZone directly for a free estimate on your paver, concrete or landscaping supply needs.
FAQ
What are the disadvantages of polymeric sand?
Polymeric sand requires precise installation conditions: a dry surface, proper joint depth and controlled activation. If applied incorrectly, it can haze, wash out, or fail to bond, and it is not suitable for submerged or constantly wet areas.
What works better than polymeric sand?
For most residential paver joints, polymeric sand outperforms plain jointing sand because it resists erosion and weed growth once properly cured. For pool edges or poorly draining areas where polymeric sand is not appropriate, a professional assessment of the base and drainage is a better first step than switching sand types alone.
Do you really need polymeric sand for pavers?
You do not strictly need it, but plain sand is more prone to shifting, weed growth and washout over time. Polymeric sand is widely recommended by manufacturers for driveways, patios and walkways where joint stability and reduced maintenance matter.
Does polymeric sand harden like cement?
No, it forms a flexible, semi-rigid bond rather than a rigid cement-like set, which allows joints to move slightly with paver settling and freeze-thaw cycling. Manufacturer guidance notes it can soften temporarily in humid conditions and re-harden as it dries, per Techniseal’s product guide.