
Herringbone, running bond, basketweave and stack bond cover the practical range of concrete paver patterns for most homes. Choose the pattern for how the space will be used and how large it is, but the pattern itself is the easy decision. What actually determines whether your patio survives Edmonton’s freeze-thaw cycles is a properly prepared subgrade and a correctly compacted granular base underneath it.
Table of Contents
- Common paver patterns and where each one works best
- Choosing a pattern for your space: scale, flow and drainage
- Installation essentials: base, bedding and edge restraint
- Step-by-step laying techniques for each pattern
- Finishing, jointing and winter care for freeze-thaw climates
- ProZone perspective: contractor checklist and when to call a pro
- Common mistakes to avoid when installing different patterns
- Planning curved or irregular pattern layouts
- Transitioning between patterns in one installation
- Integrating patterns with landscape and architectural features
- What actually matters most in a paver project
- Get your paver project built to last
- FAQ
- Sources
Common paver patterns and where each one works best
Herringbone sets rectangular units at 90 or 45 degree angles in an interlocking zigzag. Each paver locks against its neighbours on two sides instead of one, which spreads vehicle and foot traffic loads more evenly across the surface. That mechanical interlock is why herringbone shows up on driveways and anywhere heavy or repeated loads are expected.
Running bond, also called stretcher bond, lays rectangular pavers end to end in straight rows, with each row offset by half a unit from the one before it. It is the simplest pattern to cut and lay, which keeps labour time down, but it offers less interlock than herringbone and is better suited to walkways, patios and other pedestrian-only areas.
Basketweave pairs two or three rectangular pavers into a square module, then alternates the orientation of each module (horizontal, then vertical) to create a woven look. It reads as formal and symmetrical, which suits smaller patios, courtyards and areas near a house’s foundation where a tighter, tiled appearance complements the architecture.
Stack bond lines pavers up in a simple grid, with every joint aligned both horizontally and vertically. It has no interlock at all, so it depends entirely on edge restraint and base stability to stay in place; we reserve it for low-traffic accent areas, borders or spaces where a clean, modern grid line matters more than long-term joint stability.
A few things change how any of these patterns actually look and perform once they are on the ground:
- Paver aspect ratio (the ratio of length to width) controls how tight the herringbone zigzag or basketweave weave appears: a 2:1 ratio is standard and gives the cleanest geometry.
- Module size should scale with the area: small pavers in a large driveway multiply joint lines and labour, while oversized units in a small patio can look clumsy.
- Cutting needs rise sharply with herringbone and basketweave along borders and curves, where every edge paver needs a custom cut.
- DIY difficulty runs lowest for stack bond and running bond, moderate for basketweave, and highest for herringbone because of the volume of edge cuts and the need for tight tolerances to keep the interlock working.
Choosing a pattern for your space: scale, flow and drainage
Matching a pattern to a space starts with dimensions. A large open driveway or patio can carry a bold 45 degree herringbone without looking busy, while a narrow walkway usually reads better in running bond, where the long sightline of the offset joints draws the eye forward rather than sideways.
Furniture and traffic flow matter just as much as square footage. A dining patio with a fixed table and chairs benefits from a basketweave or stack bond field that stays visually quiet under furniture, with a herringbone or soldier course (a row of pavers laid perpendicular to the main field, like soldiers standing at attention) used as a border to frame the whole space.
A few design moves give a pattern more structure without adding real complexity:
- Borders and soldier courses frame a field pattern and give installers a clean line to cut against, which reduces wasted cuts.
- Contrasting stretcher rows between two pattern zones (for example, where a patio meets a walkway) signal a transition without a hard material change.
- Orientation of the herringbone grid can be run parallel or perpendicular to a house wall to either elongate or widen the visual size of a space.
- Permeable paver layouts, which use open-graded aggregate joints and a reservoir base instead of standard bedding sand, are worth considering where drainage, runoff or local stormwater rules are a concern; our guide to permeable pavers covers when that system actually makes sense versus a conventional base.
Permeable performance depends on the full reservoir and underdrain assembly beneath the surface, not on the surface pattern itself. Swapping in a permeable-style paver without the matching base design will not manage stormwater any differently than a standard installation.
Installation essentials: base, bedding and edge restraint
Pattern choice is the part homeowners spend the most time on, and it is also the part that matters least for longevity. The excavation, subgrade and granular base beneath the pavers determine whether the surface stays flat through Edmonton’s seasonal freeze-thaw shifts, when repeated freezing and thawing of ground moisture pushes and settles unsupported pavers unevenly.
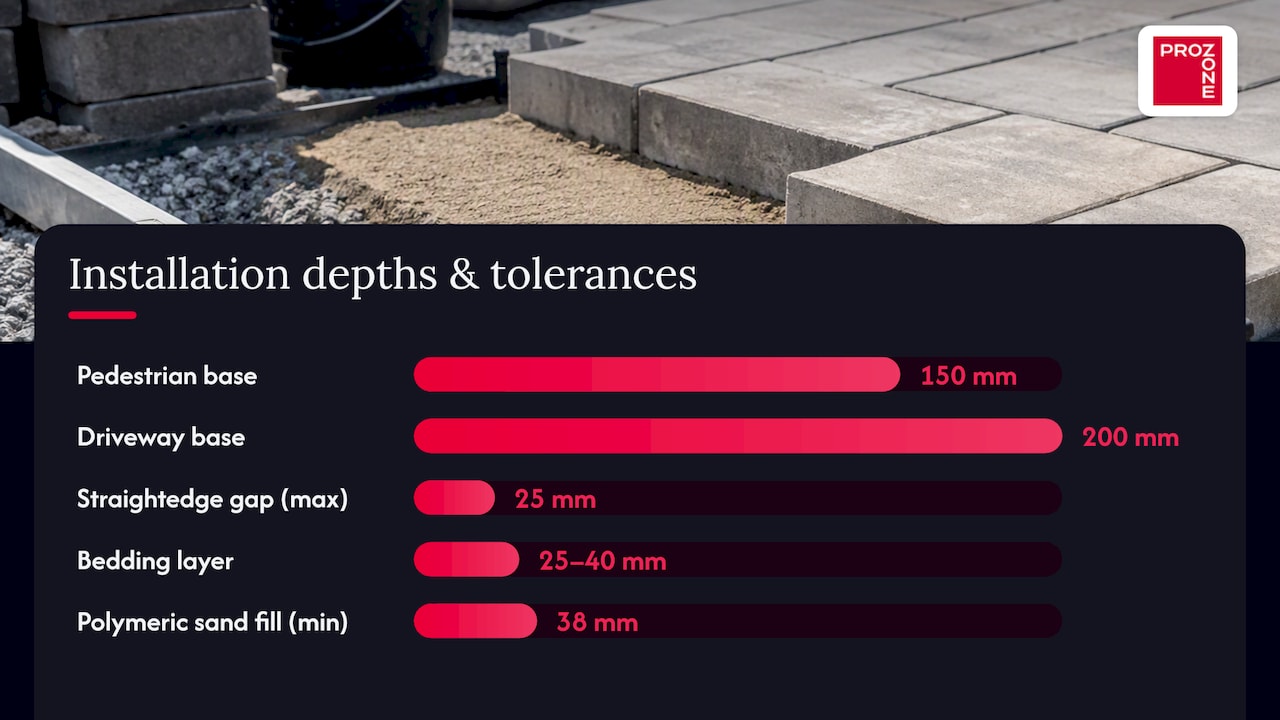
- Excavate to the correct depth. Municipal construction specifications call for granular base depths of roughly 150 millimetres under pedestrian walkways and 200 millimetres under driveways and vehicular areas, with concrete base options used for heavier vehicular loads.
- Compact the subgrade and base in lifts. Each layer of granular base should be compacted to a specified density, commonly around 98% standard Proctor density, as municipal unit paver specifications require, before the next layer goes down.
- Check surface regularity with a straightedge. A 3 metre straightedge laid across the compacted aggregate should show no more than a 25 millimetre gap underneath, tightening to 10 millimetres on the bedding surface for permeable systems, following Toronto’s TS 861 tolerance standard.
- Screed a bedding course of clean, coarse sand. A consistent 25 to 40 millimetre layer gives pavers a uniform setting bed without allowing them to float on an compacted cushion.
- Install edge restraint before placing the field. Aluminum, plastic or concrete edging holds the outer rows in place and stops lateral creep, which is the most common cause of joint widening over time; our paver edging guide runs through the options and when each one applies.
Base material selection is not interchangeable across climates. Base materials suited to Alberta winters need to drain freely and resist frost heave, which is why a well-graded, angular crushed aggregate performs better here than a rounded pit-run gravel that holds water against the subgrade.
Joint width also has a technical minimum, not just an aesthetic one. Municipal guidance recommends joint widths between 3 and 25 millimetres depending on paver type, with a minimum fill depth of around 38 millimetres needed for full polymeric sand stabilization, per Brampton’s unit paver specification. Skipping that depth is a common reason polymeric sand fails prematurely.
Step-by-step laying techniques for each pattern
Every pattern follows the same basic work order before the pattern-specific details come into play.
- Set stringlines along two perpendicular reference edges to establish true, square working lines for the whole field.
- Lay a starter row tight against the stringline, checking it with a level every few units.
- Place pavers hand-tight, working from the starter row outward, leaving no gaps to close up later.
- Run a plate compactor over the finished field in two passes before jointing sand goes in, to seat the units into the bedding layer.
Herringbone needs the starter row set at exactly 45 or 90 degrees to the border, because every subsequent row depends on that first angle staying true. Work outward in a staircase pattern, checking square every four or five rows; a drift of even a few millimetres compounds quickly across a large field.
Running bond is the most forgiving pattern to start, since each row simply offsets by half a unit from the last. The main risk is losing that half-unit offset over a long run, so re-measure from the original stringline every six to eight rows rather than from the row just placed.
Basketweave requires handling pavers in matched pairs or trios, alternating the orientation of each module by 90 degrees. Pre-sorting units by exact dimension before starting prevents the small sizing inconsistencies that throw off the weave’s symmetry.
Stack bond has no interlock to hide small errors, so every joint line must stay perfectly straight in both directions. We recommend chalk-lining both axes across the full field before placing a single paver, since there is no forgiving zigzag to mask a crooked row.
Pro Tip: Dry-lay a small test section of any pattern on a tarp before committing to the full installation; it reveals cutting requirements and joint spacing issues while they are still easy to fix.
Finishing, jointing and winter care for freeze-thaw climates
Polymeric sand stabilizes joints and resists washout better than plain jointing sand, but it only performs when installed correctly. Sweep it into joints dry, compact with a plate compactor while sweeping to settle it to full depth, then apply water in controlled stages rather than a single heavy soak; our polymeric sand guide covers the staged wetting process that activates the polymer binder without washing it back out or leaving a hazy residue on the paver surface.
CAN3 A231.2, the national standard for precast concrete pavers, sets a minimum average compressive strength of 50 MPa in cube testing, or 40 MPa measured at delivery, along with freeze-thaw resistance testing in a 3% saline solution. That strength threshold is what separates a paver rated for Edmonton winters from one that was never tested for our freeze-thaw cycle at all.
A few finishing and maintenance habits protect that investment once the pavers are down:
- Seal selectively: a sealer improves colour retention and can reduce staining, but it also changes surface traction when wet, so weigh that trade-off for high-traffic or pool-adjacent areas.
- Use a plastic shovel for snow clearing and limit de-icing salt, since some de-icers accelerate surface scaling on concrete products over repeated seasons.
- Inspect joints every spring after the thaw, looking for sand loss, settling or paver movement before small issues become structural ones.
- Repoint joints with fresh polymeric sand as soon as gaps appear rather than waiting for a full season of erosion to widen them further.
ProZone perspective: contractor checklist and when to call a pro
We treat paver jobs the way we treat any load-bearing concrete work: documentation first, installation second. Before any material purchase, we expect samples, shop drawings and submittals confirming the exact paver specification, which is standard municipal practice for unit paver projects, not an optional step reserved for commercial sites.
Ask any supplier or contractor for these before signing off on a job:
- CSA/CAN3 A231.2 compliance documentation confirming compressive strength and freeze-thaw testing results for the specific paver lot.
- Compressive strength figures meeting the 50 MPa average or 40 MPa delivery minimum, not a generic manufacturer claim.
- Freeze-thaw resistance results from saline testing, since Edmonton’s cycle count is high enough that untested units are a real risk.
- A compaction and straightedge test plan for the base and bedding layers, documented before pavers go down, not after.
DIY installation is realistic for a small, flat patio with simple running bond or basketweave geometry and good natural drainage. Site conditions involving poor drainage, sloped grades, retaining structures or vehicular loading cross into territory where soil conditions and compaction equipment make professional grading and base work the safer route; our guide on choosing a paving contractor outlines the questions worth asking before you hire.
Common mistakes to avoid when installing different patterns
The most frequent herringbone failure is losing the 45 or 90 degree starting angle, which throws off every row that follows and forces excessive cutting near borders. Checking square every few rows catches this before it compounds.
Running bond installs often skip re-establishing the half-unit offset from the original stringline, letting rows drift out of alignment over a long run. Basketweave jobs commonly fail when pavers from different production runs get mixed together, since even small dimensional variance breaks the symmetry the pattern depends on.
Stack bond is unforgiving of base settling because it has no interlock to mask movement; skimping on compaction here shows up as crooked joint lines within a single season. Across all patterns, the single most common error is undersized joint width or shallow jointing sand depth, which falls short of the roughly 38 millimetre fill depth needed for proper polymeric sand stabilization and leads to early joint failure and weed growth.
Cutting corners on edge restraint is another recurring issue: without it, even a perfectly laid herringbone field will creep outward under repeated traffic, widening every joint in the field over time.
Planning curved or irregular pattern layouts
Curved walkways and organic patio shapes work best with patterns that tolerate irregular cutting without losing their visual logic, which rules out stack bond almost immediately. Herringbone and running bond both adapt reasonably well to curves because their repeating module can be cut at an angle along the border without breaking the pattern’s internal logic.
Lay out the curve with a garden hose or rope first, then mark it with marking paint before any excavation begins; this lets you adjust the line before committing to cut pavers. Plan for a higher proportion of cut units along any curve, since every paver touching the border needs an individual cut rather than a repeating standard shape.
Keep a consistent joint width through the curve by working from both ends toward the middle rather than cutting progressively smaller slivers in one direction. A wet saw with a diamond blade gives cleaner curved cuts than a chisel and hammer, and it reduces the risk of cracking a unit along a stress line.
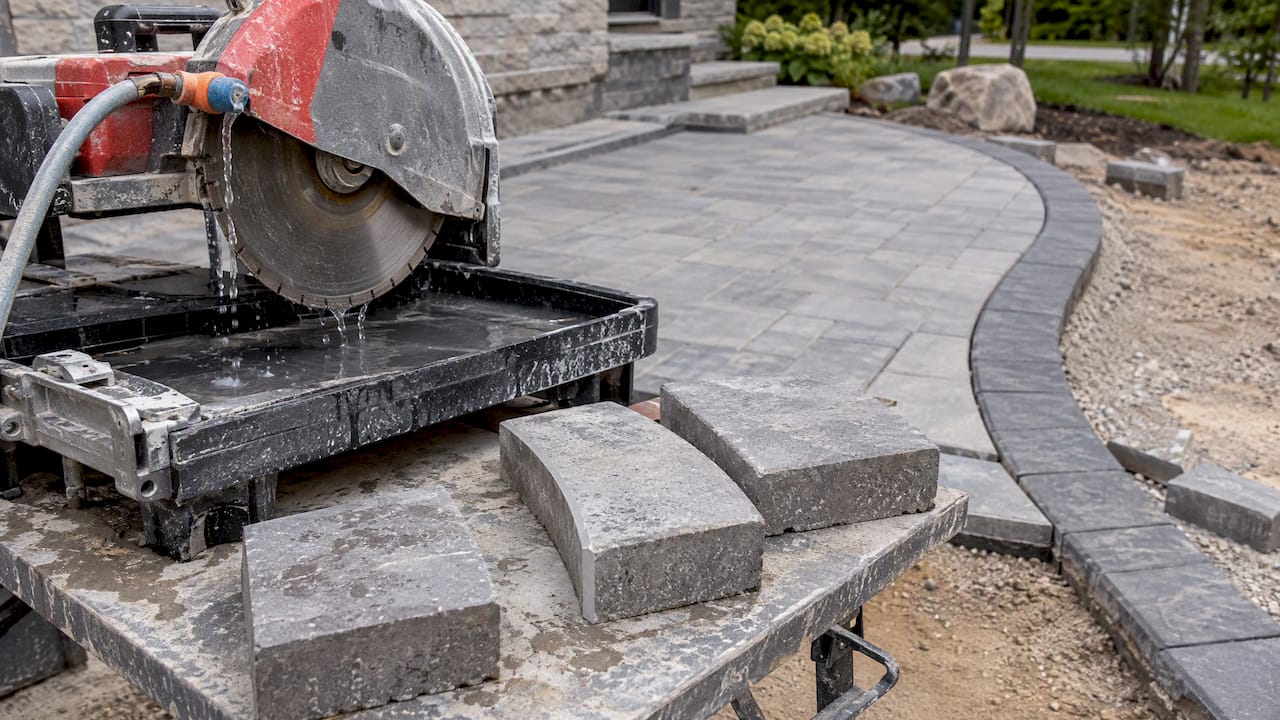
For tight radius curves, consider a smaller paver module: the same geometry that makes small units tedious across a large field makes them far easier to fit around a curve without producing awkward, oversized wedge cuts.
Transitioning between patterns in one installation
A single project often needs more than one pattern: herringbone on a driveway section, basketweave on an adjoining patio, running bond on the connecting walkway. The transition between them needs a deliberate break, not a blended edge where two patterns simply meet mid-field.
A soldier course, a border band of a contrasting paver colour, or a change in material entirely (concrete pavers to a flagstone accent, for example) all give the eye a clear signal that the pattern is changing intentionally. Without that visual break, a transition reads as a mistake rather than a design choice.
Technically, every pattern transition is also a joint in the base and edge restraint system. Run continuous edge restraint across the transition line rather than stopping and restarting it at the pattern change, since a gap there is a common point of future settling.
Match base depth and compaction standards across the full project even when the surface patterns differ: a driveway section still needs the 200 millimetre vehicular base depth even where it borders a patio built to the lighter pedestrian standard, and the transition zone should follow whichever load case is higher.
Integrating patterns with landscape and architectural features
A pattern reads best when its orientation responds to the architecture around it. Running the long axis of a herringbone parallel to a house’s main facade tends to visually widen a narrow backyard, while running it perpendicular draws the eye toward a focal point like a fire pit or garden feature.
Planting beds, retaining walls and water features all give natural locations for a border course or pattern change, since the hardscape edge lines up with an existing landscape line instead of floating in open space. A basketweave field framed by a soldier course that aligns with a raised planter bed, for instance, ties the paved area to the planting layout rather than treating them as separate elements.
Steps, thresholds and door locations are worth planning around before the field pattern is set: a herringbone pattern that meets a door threshold at an awkward angle forces a line of narrow, fragile cut pieces right where foot traffic concentrates. Adjusting the starter row position to land a full paver at that threshold avoids a weak point exactly where it matters most.
Lighting fixtures, drain covers and utility access points should be marked on the layout plan before installation starts, since cutting a clean opening into an interlocking field after the fact is far harder than planning the module layout around it from day one.
What actually matters most in a paver project
Most paver content online treats pattern choice as the main decision, with base preparation mentioned briefly near the end. We would reverse that emphasis entirely: pattern is reversible in the sense that a poorly chosen but well-built pattern can be re-sanded, resealed or even partially relaid, while a poorly compacted base shows up as sinking, heaving and cracked units within one or two freeze-thaw seasons and generally requires full reconstruction.
The conventional advice to “pick a pattern that suits your style” undersells how much a paver’s own compressive strength and freeze-thaw rating matter in a climate like ours. A beautiful herringbone driveway built with pavers that were never tested to the CAN3 A231.2 standard is a short-term result dressed up as a long-term one.
If you take one thing from this guide, prioritize the documentation: compressive strength figures, freeze-thaw test results and a compaction plan, before you fall in love with a pattern photo. The pattern will still look good in five years. An untested base will not.
— ProZone
Get your paver project built to last
We provide materials and base construction to ensure paver patterns hold up through an Edmonton winter, including Barkman Concrete Products and aggregates available at our landscape supplies centre and subgrade, compaction, and installation services described on our concrete services page. Free on-site consultations may be available within a 100-kilometre radius. Contact us via the online form or by phone to request a quote for your patio, walkway, or driveway project.
FAQ
Can I use cement between pavers?
Cement-based mortar is not standard practice for interlocking concrete pavers; it restricts the slight flexibility the system needs and tends to crack under freeze-thaw movement. Polymeric sand is the jointing material specified in municipal unit paver standards because it locks joints while still allowing minor seasonal movement.
What is the strongest block paving pattern?
Herringbone provides the most mechanical interlock of the common patterns because each paver is braced on two sides by its neighbours, which is why it is the standard choice for driveways and other high-load areas. Stack bond has no interlock at all and relies entirely on edge restraint and base stability.
How do I design a patio with pavers?
Start by matching pattern scale to the patio’s dimensions and furniture layout, using a quieter pattern like basketweave or stack bond under a fixed dining set and a bolder herringbone or border detail at the edges. Confirm base depth and edge restraint requirements before finalizing the pattern, since those decisions affect how the finished layout performs over time.
How thick should concrete pavers be?
Paver thickness depends on load: thinner units suit pedestrian walkways and patios, while driveways and vehicular areas need thicker units paired with a deeper compacted base, commonly around 200 millimetres, to handle the load. The paver itself also needs to meet CAN3 A231.2 compressive strength minimums regardless of its thickness.