
Neglected concrete cracks and spalls are not just eyesores. They are liability risks, budget drains, and compliance headaches waiting to happen. In Edmonton, freeze-thaw cycles worsen cracks rapidly if left untreated, turning a minor surface flaw into a structural problem within a single winter season. For property managers and facility managers responsible for commercial and municipal assets, the cost of inaction almost always exceeds the cost of timely repair. This guide walks you through every stage of concrete repair, from initial assessment to post-repair verification, with Edmonton’s climate conditions built into every recommendation.
Table of Contents
- What property managers need before starting repairs
- Step-by-step concrete crack and spall repair process
- Troubleshooting and avoiding common mistakes
- Expected results and post-repair verification
- Professional repair and ongoing maintenance options
- Frequently asked questions
Key Takeaways
| Point | Details |
|---|---|
| Proper prep is crucial | Surface preparation to industry standards prevents future repair failure and maximizes longevity. |
| Match repair material to crack type | Selecting the right filler—flexible or structural—based on crack movement avoids wasted effort. |
| Careful curing ensures durability | Allow full cure times before opening surfaces to ensure repairs withstand Edmonton’s harsh weather. |
| Monitor and seal regularly | Inspect repaired areas each season and reseal as needed to defend against freeze-thaw damage. |
| Professional help for major repairs | Engage concrete specialists for complex cracks, structural faults, or large recurring problems. |
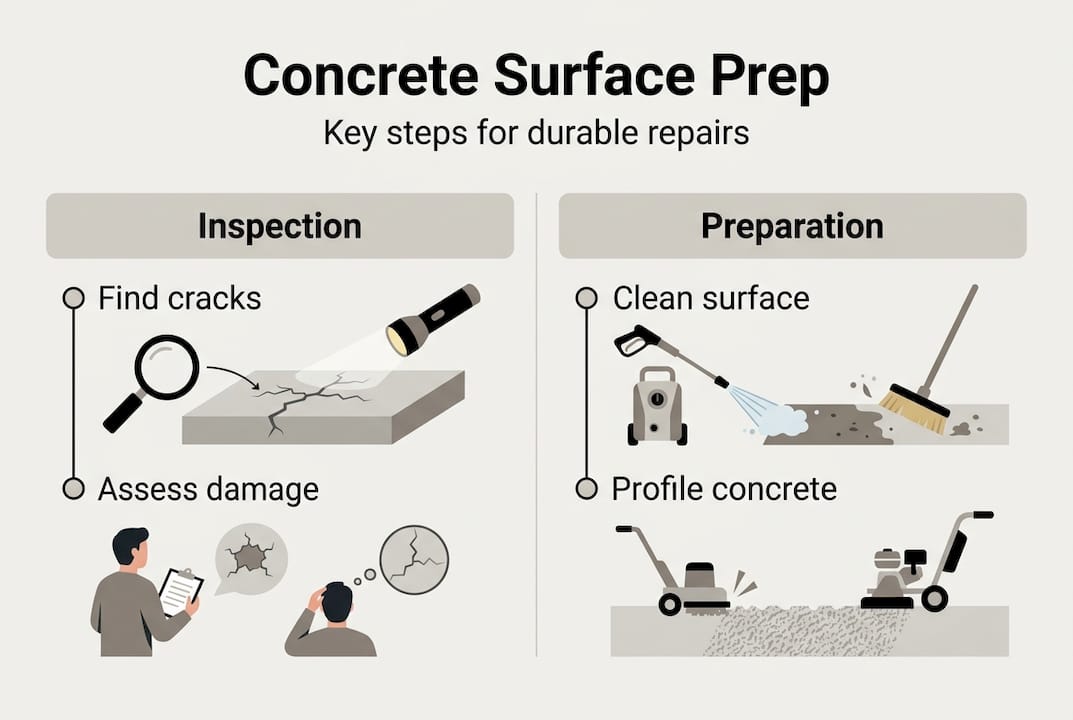
What property managers need before starting repairs
To start any effective concrete repair, you need to assess, plan, and equip yourself properly. Skipping this stage is the single most common reason repairs fail within the first year.
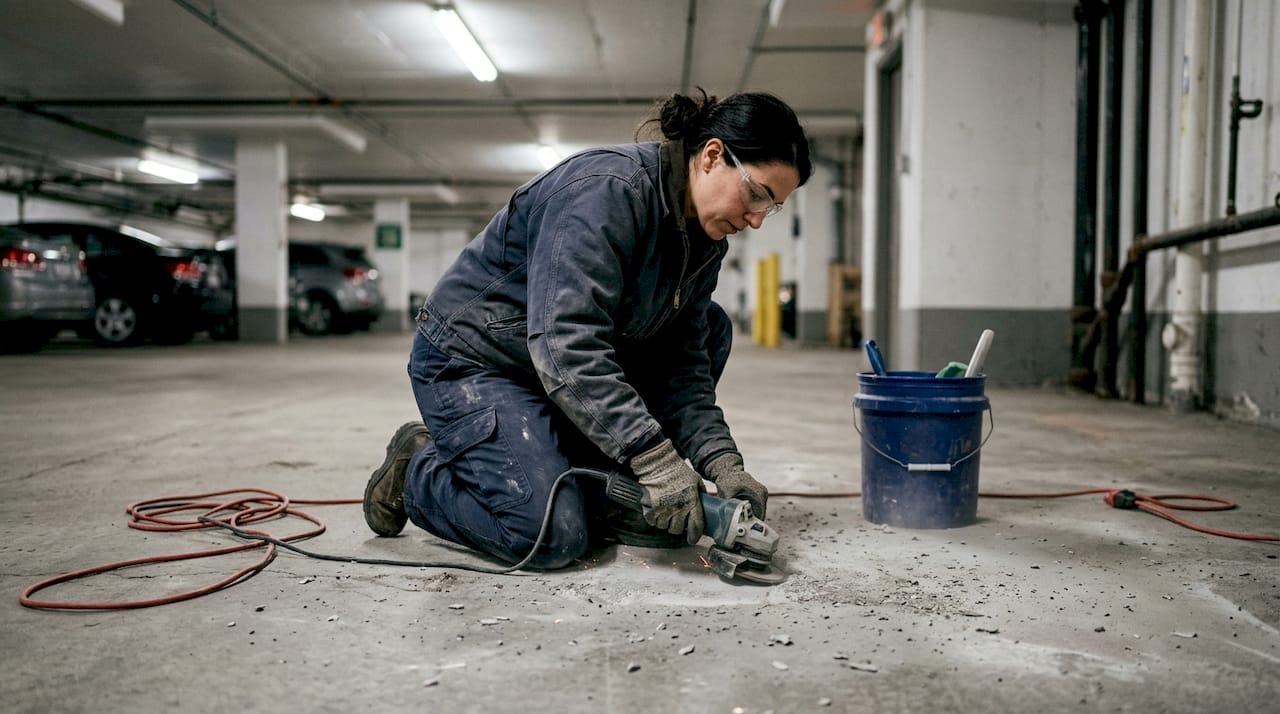
Before touching a crack or spall, gather the right safety gear and tools. You will need:
- Safety gear: Safety glasses, nitrile gloves, dust mask (N95 minimum), knee pads, and steel-toed boots
- Tools: Angle grinder or cold chisel, wire brush, vacuum or compressed air blower, caulking gun, margin trowel, and a mixing paddle
- Materials: Polyurethane sealant, epoxy injection kits, cementitious patching compound, backer rod, and concrete bonding agent
Once you have your equipment, inspect the full surface area. Look for concrete crack causes like soil settlement, drainage failures, or freeze-thaw expansion before you start any repair work. Treating the symptom without addressing the root cause guarantees repeat failures.
Surface preparation is where most managers underinvest. CSP standards for bond strength require a Concrete Surface Profile (CSP) of 3 to 5, achieved through mechanical abrasion such as grinding or shot blasting. This profile gives repair materials something to grip. Without it, even premium patching compounds will delaminate under Edmonton’s temperature swings.
| Preparation method | CSP level achieved | Best used for |
|---|---|---|
| Hand grinding | CSP 2-3 | Small patches, hairline cracks |
| Shot blasting | CSP 3-5 | Large slabs, parking decks |
| Scarifying | CSP 4-6 | Heavy spall removal, overlays |
| Acid etching | CSP 1-3 | Light surface prep only |
Also review concrete repair benefits for your asset type before committing to a repair strategy. Understanding the return on investment helps you justify the budget to stakeholders.
Pro Tip: Spend at least 30% of your total repair time on surface preparation. Managers who rush this step spend twice as much on re-repairs within 18 months.
Step-by-step concrete crack and spall repair process
With proper tools and a careful site assessment, you can proceed through the repair steps systematically. Here is the full sequence used by experienced crews on Edmonton commercial properties.
-
Identify the crack or spall type. Hairline cracks (under 1/16 inch) are usually cosmetic. Shrinkage cracks are common in slabs and rarely structural. Structural cracks cross load-bearing zones and are often wider than 1/8 inch. Spalls are surface delaminations caused by freeze-thaw or rebar corrosion. Each type demands a different repair approach, so crack type identification is your first decision point.
-
Clean the crack thoroughly. Use a wire brush to remove loose debris, then blow out dust with compressed air. Apply a degreaser if oil or chemical contamination is present. Any contamination left in the crack will prevent bonding.
-
Prepare the crack geometry. For cracks wider than 1/4 inch, use an angle grinder to cut a V-groove shape. This increases the surface area for bonding. Insert a backer rod (a foam cylinder) into deep cracks to control sealant depth. For spalls, undercut the edges at 90 degrees or slightly inverted to lock the patch in place.
-
Select the right repair material. This is where many managers make costly errors. Use the table below as a quick reference:
| Crack type | Width | Recommended material |
|---|---|---|
| Hairline / cosmetic | Under 1/16 inch | Concrete sealer or crack filler |
| Shrinkage crack | 1/16 to 1/4 inch | Polyurethane sealant |
| Structural crack | Over 1/4 inch | Epoxy injection |
| Spall or surface pop | Varies | Cementitious patching compound |
| Settlement over 1/2 inch | Large area | Slabjacking or full replacement |
Epoxy for structural cracks and slabjacking for settlement repairs over 1/2 inch are the industry-standard choices for load-bearing surfaces. For cost-effective crack repair on non-structural areas, polyurethane sealants offer flexibility and durability at a lower price point.
-
Apply the repair material. Follow the manufacturer’s mixing ratios exactly. For epoxy injections, start at the lowest point of the crack and work upward. For cementitious patches, apply in layers no thicker than 1/2 inch per pass. Overfilling and then grinding flush is better than underfilling. Wear gloves and eye protection throughout, as epoxy resins are skin irritants.
-
Allow proper cure time. Do not rush this. Reopening a surface too early is one of the most common causes of repair failure.
Minimum cure times before reopening to foot or vehicle traffic: Polyurethane sealants: 24 to 48 hours. Cementitious patches: 24 to 72 hours. Epoxy injections: 24 to 72 hours depending on temperature. Full concrete mixes: 7 days minimum for foot traffic, 28 days for heavy vehicle loads. Cold Edmonton temperatures slow cure times significantly, so always add buffer time in fall and winter.
- Seal the repaired surface. Apply a penetrating concrete sealer over the entire repaired area. This step is critical for parking lot repair surfaces and concrete stairs repair zones that face heavy foot traffic and winter salt exposure.
Pro Tip: For active or moving cracks, always choose a flexible polyurethane sealant rather than rigid epoxy. Rigid materials crack again when the substrate shifts, wasting your repair investment entirely.
For complex repairs involving ACI repair procedures, consult the American Concrete Institute guidelines to ensure your method meets structural performance standards.
Troubleshooting and avoiding common mistakes
Even with a solid process, small missteps can undo hours of work and increase long-term risk. Here are the most frequent errors facility managers encounter and how to avoid them.
Common mistakes to watch for:
- Skipping surface preparation or using only hand tools when mechanical abrasion is needed
- Applying repair material to a wet or frozen substrate (Edmonton winters make this a real risk)
- Mismatching material to crack type, such as using rigid epoxy on a moving crack
- Underfilling cracks and leaving voids that trap water
- Reopening the surface before cure time is complete
- Failing to seal the repair, leaving it exposed to freeze-thaw cycles
Matching repair materials to crack movement is the single most important factor in preventing repair failure. A rigid patch on a flexible crack will fail within one freeze-thaw cycle.
After completing repairs, run these quality checks:
- Tap the patched area with a hammer. A hollow sound indicates delamination and the patch must be removed and redone.
- Inspect edges for gaps or lifting, especially after the first frost.
- Check that the repaired surface is flush with the surrounding concrete to prevent trip hazards.
- Review parking lot repairs and high-traffic zones first, as these show failure signs earliest.
For budget planning, review concrete repair costs to understand how repair complexity affects pricing and how to allocate maintenance funds effectively across your facility portfolio.
Also check repair failure prevention resources to understand how material selection and application technique interact with Edmonton’s climate conditions.
Pro Tip: Keep a maintenance log for every crack you repair. Record the location, width, repair material used, date, and cure time. This documentation is invaluable for property audits, insurance claims, and planning future maintenance cycles.
Expected results and post-repair verification
After addressing cracks and spalls methodically, managers can look forward to stable surfaces and reduced costs. But verification is not optional. It is the step that separates a durable repair from one that fails quietly over winter.
A successful repair should look and perform like this:
- The patched surface is flush with surrounding concrete, with no visible gaps or raised edges
- No hollow sound when tapped with a hammer
- Sealant is fully cured and shows no tackiness or soft spots
- No water pooling near the repaired zone after rain or snowmelt
- The area passes a visual inspection after the first freeze-thaw cycle
Sealing repaired surfaces protects against future freeze-thaw cycles, which is non-negotiable in Edmonton where temperatures can swing 40 degrees Celsius between seasons. Skipping the sealer after patching is like patching a roof and leaving a hole in the shingles.
For ongoing monitoring, build these checkpoints into your facility calendar:
- Spring inspection (April to May): Check all repaired zones after winter for new cracking, heaving, or sealant failure
- Fall inspection (September to October): Reseal any areas showing wear before freeze-thaw season begins
- Post-storm checks: Inspect high-traffic areas after major freeze-thaw events or heavy snowfall
- Annual documentation: Update your maintenance log with photos and measurements for each repaired zone
Review concrete repair outcomes to benchmark your results against industry standards for Edmonton commercial properties. Pair this with winter maintenance best practices to extend the life of every repair you make.
For maintenance scheduling guidance specific to concrete assets, industry resources can help you build a calendar that aligns with Edmonton’s seasonal demands.
Professional repair and ongoing maintenance options
If your facility demands professional attention or recurring repair needs, expert services can maximize asset value. Managing concrete repairs across a large commercial or municipal property is a significant operational commitment, and some situations genuinely require professional crews with specialized equipment.

ProZone Ltd provides Edmonton concrete repairs for commercial, municipal, and industrial clients across the region. Our crews handle everything from routine crack sealing to large-scale slab restoration, using equipment and materials suited to Alberta’s climate demands. We also specialize in sidewalk and curb repair, keeping pedestrian zones safe and compliant with municipal standards. If you are unsure which Edmonton service types fit your facility’s needs, our team can assess your property and recommend a maintenance plan that fits your budget and timeline.
Frequently asked questions
How do I identify structural versus non-structural cracks?
Structural cracks wider than 1/8 inch should be reviewed by a professional, as they often cross load-bearing areas and indicate deeper foundation or settlement issues. Narrower, surface-level cracks are typically non-structural and can be handled with standard sealants.
How long does each repair material need to cure before use?
Cure times vary by material: caulks and polyurethane sealants cure in 24 to 48 hours, cementitious patches take 24 to 72 hours, and full concrete mixes need up to 28 days before heavy vehicle use. Always add extra time in cold Edmonton weather.
Should I seal repaired cracks every year in Edmonton?
Yes. Sealing protects against freeze-thaw cycles that are especially aggressive in Edmonton, where repeated expansion and contraction can reopen even well-repaired cracks within a single season.
What is the best way to prepare concrete for patching?
CSP 3 to 5 profiles achieved through mechanical abrasion such as shot blasting or grinding give repair materials the surface grip they need for a lasting bond. Hand tools alone rarely achieve adequate profile depth.
When should a facility manager call a professional?
Cracks over 1 inch wide or any repair involving structural zones, exposed rebar, or significant settlement should be handled by a licensed contractor with the right equipment and liability coverage.
Recommended
- Optimize your asphalt repair workflow in Edmonton: 2026
- Budgeting for Concrete Repairs: Understanding the Costs for Edmonton Businesses – ProZone Ltd. – Home, Main office, asphalt, concrete, snow removal, Alberta, Edmonton, SherwoodPark, rubber paving, streetbond, thermoplastic, landscaping supplies
- Top road repair methods for Edmonton property managers 2026
- Guide to sidewalk restoration for Edmonton property managers
- Drain repair step by step: DIY guide for UK homeowners