
TL;DR:
- A proper patio installation involves meticulous excavation, base construction, paver placement, and joint finishing to ensure durability. Homeowners must carefully follow each step, especially preparing the site and installing the aggregate base, to prevent problems like shifting and cracking. Using the correct materials, tools, and techniques tailored for Edmonton’s freeze-thaw conditions optimizes the patio’s lifespan.
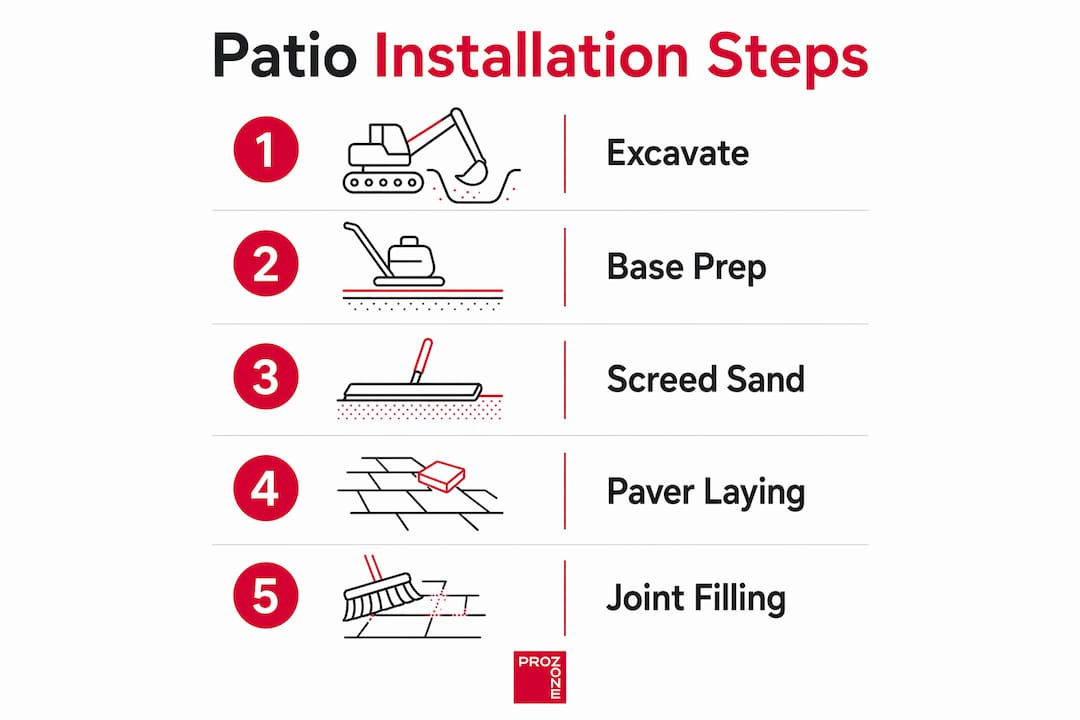
A step by step patio installation is the structured sequence of excavation, base construction, paver laying, and joint finishing that produces a durable, properly drained outdoor surface. Done correctly, the result is a patio that resists the freeze-thaw cycles Edmonton homeowners face every year. Skipping or rushing any stage causes settling, cracking, and drainage failures within the first season. This guide covers every phase of the patio building steps, from tools and materials through to the final sweep of polymeric sand, with technical standards and Prozoneltd expertise applied throughout.
What tools and materials are essential for a successful patio installation?
The right materials determine how long your patio performs. Every layer in a sand-set paver system serves a specific structural purpose, and substituting materials undermines the whole build.
Core materials
| Material | Role | Specification |
|---|---|---|
| Crushed aggregate (road crush) | Load-bearing base | 6–8 inches in freeze-thaw zones |
| ASTM C33 concrete sand | Bedding layer | 1 inch uniform depth |
| Concrete or natural stone pavers | Surface | Minimum 60mm thick for pedestrian use |
| Polymeric joint sand | Joint locking | Activates with water to harden |
| Plastic or steel edge restraints | Perimeter containment | Anchored into compacted base |
Prozoneltd supplies road crush aggregate and limestone compaction stone suited to Alberta’s ground conditions. Using substandard fill material is one of the most common reasons DIY patios fail prematurely.
Required tools
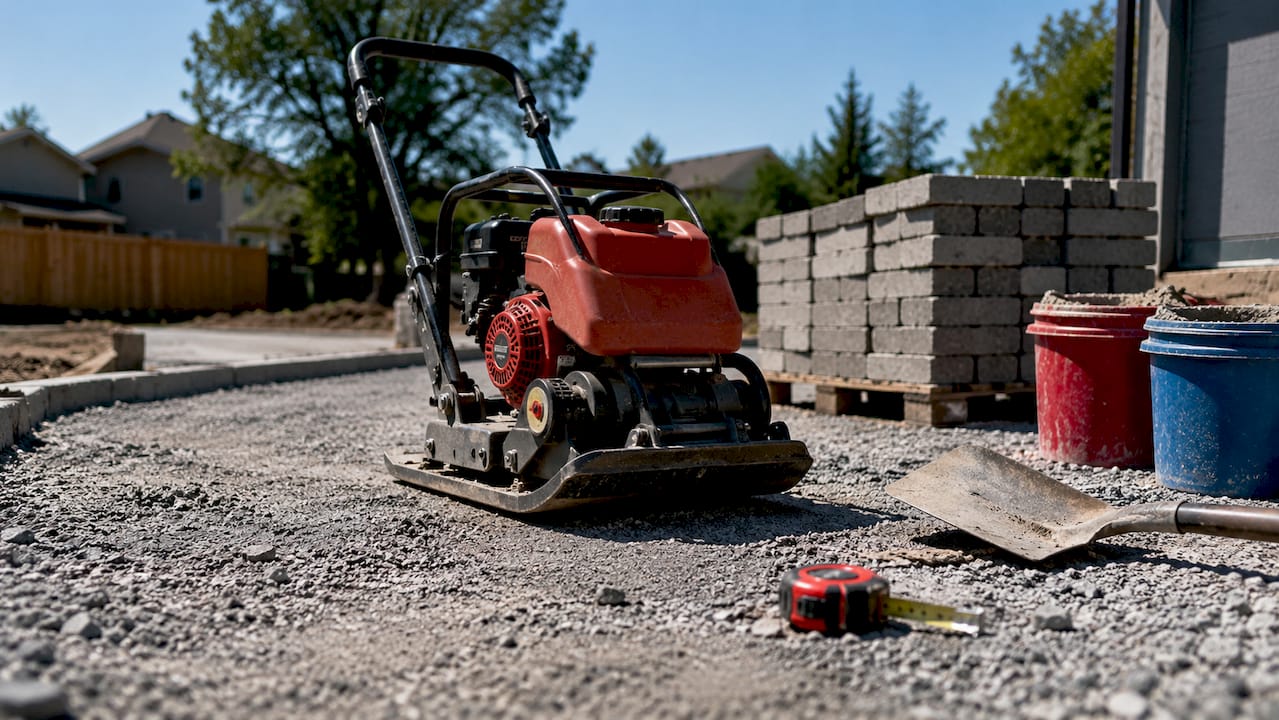
- Plate compactor (rental is fine for residential scale)
- Rubber mallet
- 4-foot level and string lines
- Tape measure and marking paint
- Shovel and wheelbarrow
- Circular saw with diamond blade for cutting pavers
- Screed pipes (1-inch diameter) for setting bedding sand depth
- Broom for sweeping joint sand
A typical DIY patio project takes around two days to complete from excavation through paver laying. That timeline assumes all materials are on site before you start. Arriving at day two without polymeric sand or edge restraints forces costly delays.
Pro Tip: Rent a plate compactor with a rubber pad attachment. Running a bare steel plate over finished pavers chips edges and damages the surface.
How to prepare the site and excavate to the correct depth and slope?
Site preparation is the phase most homeowners underestimate. The decisions made here, including depth, slope, and squareness, determine every layer above.
-
Mark the patio boundaries. Drive stakes at each corner and run string lines between them. Check the layout is square by measuring diagonals. Both diagonals must match within 6mm.
-
Set the drainage slope. The standard drainage slope is 1/4 inch per foot, running away from the house. On a 10-foot patio, that is a 2.5-inch drop from the house edge to the outer edge. This slope prevents water from pooling against your foundation.
-
Calculate excavation depth. Add your base depth, bedding sand depth (1 inch), and paver thickness, then add 1 inch for settling tolerance. In Edmonton’s freeze-thaw climate, plan for a minimum 6-inch aggregate base, which means total excavation typically reaches 9–11 inches below finished grade.
-
Excavate and remove all organic material. Roots and topsoil compress unevenly. Remove them completely. Proper excavation depth is the single most critical factor in preventing patio shifting.
-
Compact the subgrade. Run the plate compactor over the exposed soil in two perpendicular passes. Fill any low spots with compacted granular fill, not topsoil.
-
Check local setback requirements. In Edmonton, patios near property lines or utility easements may require permits. Contact the City of Edmonton or your municipality before breaking ground.
Pro Tip: Before backfilling, lay PVC conduits under the planned base area. Conduits under the base let you add gas lines for a fire pit or electrical for lighting later without tearing up the patio.
A thorough site preparation process at this stage saves significant rework later. Grading errors caught now cost minutes to fix. The same errors caught after the base is laid cost days.
What are the steps to install the aggregate base, bedding sand, and edge restraints correctly?
The aggregate base is the structural heart of the patio. Every layer above it depends on its density and flatness.
-
Spread the first lift of aggregate. Add crushed aggregate to a depth of 2–3 inches. Rake it level before compacting. Each lift compacts 15–20%, so account for that shrinkage in your material calculations.
-
Compact each lift thoroughly. Run the plate compactor in overlapping passes until the surface no longer shows movement. Skipping incremental compaction reduces base density and causes uneven settling later.
-
Repeat until you reach target depth. In freeze-thaw zones like Edmonton, the minimum base depth is 6–8 inches of compacted aggregate. Pedestrian-only patios in mild climates require a minimum of 4 inches, but that standard does not apply to Alberta conditions.
-
Extend the base beyond the patio edge. The aggregate base must extend 6 inches beyond the planned paver edge on all sides. This extension is what edge restraints anchor into. Without it, restraints pull free from soft soil within one freeze-thaw cycle.
-
Install edge restraints. Secure plastic or steel edge restraints into the extended compacted base using 12-inch spikes. Per ICPI Tech Spec 3, edge restraints are mandatory in sand-set installations to prevent lateral paver spread. Prozoneltd’s landscaping edging products are designed for this application.
-
Spread the bedding sand layer. Place 1-inch diameter screed pipes on the compacted base, spaced 4–6 feet apart. Spread ASTM C33 concrete sand and screed it flat using a straight board pulled across the pipes. The bedding sand layer is a levelling medium only. Never use it to fix base grading errors. Grading corrections belong at the aggregate base phase.
Base depth comparison by use and climate
| Application | Mild climate | Freeze-thaw zone (Edmonton) |
|---|---|---|
| Pedestrian patio | 4 inches | 6–8 inches |
| Light vehicle access | 6 inches | 8–10 inches |
| Heavy load areas | 8 inches | 10–12 inches |
Pro Tip: After screeding the bedding sand, walk off the area and do not step on it again before laying pavers. Footprints in the sand create low spots that show up as rocking pavers after compaction.
How to lay the pavers, cut edges, compact, and finish joints?
With the base and bedding sand in place, the patio building steps shift to surface work. Precision here determines the final appearance and structural lock of the surface.
-
Start from a fixed, straight edge. Begin laying pavers from the house wall or a fixed structure, moving outward. This keeps your pattern aligned from the most visible reference point.
-
Maintain consistent joint spacing. Use paver spacers or the moulded lugs on the paver edges to keep joints uniform at 2–3mm. Inconsistent spacing causes pattern drift and makes cutting edge pieces harder.
-
Cut edge pavers to fit. Measure each cut piece individually rather than assuming uniform gaps. Use a circular saw with a diamond blade or a paver splitter for clean cuts. Pieces smaller than one-third of a full paver are structurally weak and should be repositioned to avoid them.
-
Compact the installed pavers. Run the plate compactor (with rubber pad) over the entire paved surface in two perpendicular passes. This sets the pavers firmly into the bedding sand and brings the surface to its final height.
-
Sweep in polymeric joint sand. Pour dry polymeric sand over the surface and sweep it into all joints with a stiff broom. Make multiple passes until joints are filled to within 3mm of the paver surface. Compact again lightly to settle the sand.
-
Activate the polymeric sand. Mist the entire surface with water using a garden hose on a gentle spray setting. The polymeric binders activate and harden the joint sand within 24 hours. Keep foot traffic off the surface during that curing period.
Finishing and maintenance checklist
- Inspect joints after 24 hours and top up any that settled below 3mm
- Apply a penetrating paver sealer after the polymeric sand has fully cured (minimum 72 hours)
- Re-sweep polymeric sand into any joints that open after the first winter
- Check edge restraints each spring for movement caused by frost heave
- Rinse the surface annually and re-seal every 3–5 years depending on traffic and sun exposure
Choosing the right outdoor landscaping materials for Edmonton’s climate makes a measurable difference in how long the surface holds its finish.
What common mistakes hinder patio performance and how can homeowners avoid them?
Most patio failures trace back to decisions made in the first two phases of construction, not the paver laying itself.
- Insufficient excavation depth. Excavation errors cause shifting within the first season of use. Homeowners frequently underestimate how much soil must be removed to accommodate compacted base layers plus pavers.
- Ignoring the drainage slope. A flat base traps water against the foundation. Water that freezes under or around pavers expands and lifts them. The 1/4-inch-per-foot slope is not optional in Alberta.
- Skipping or misplacing edge restraints. Edge restraint failure is inevitable without anchoring into a properly extended and compacted aggregate base. Restraints driven into soil rather than gravel pull free under lateral load.
- Using bedding sand to fix base grading errors. Bedding sand used as a grading fix causes uneven settling and surface irregularities. Correct the base grade with aggregate before screeding sand.
- Skipping incremental compaction. Compacting aggregate in controlled lifts achieves the density needed for long-term stability. Dumping the full base depth and compacting once produces a soft, uneven foundation.
“The most expensive patio repairs we see in Edmonton are always the result of shortcuts taken in the first hour of excavation. The base is invisible once the pavers go down, but it controls everything above it.”
Pro Tip: Before backfilling around the patio perimeter, photograph the edge restraint installation and base depth. These photos are useful if you ever need to troubleshoot settling or plan an extension.
What I’ve learned from managing patio projects in Edmonton’s freeze-thaw climate
Working on construction projects across Alberta has reinforced one consistent truth: the patios that fail are not the ones built with expensive materials. They are the ones built on inadequate bases.
The freeze-thaw cycle in Edmonton is more aggressive than most homeowners expect. Ground temperatures can shift dramatically between october and april, and water trapped in a poorly compacted base expands with enough force to lift concrete pavers several centimetres. A patio built to the 6–8 inch base standard survives this. One built to a 3-inch base does not.
Planning for future upgrades is something most DIY guides skip entirely. Running PVC conduits under the base before you compact costs almost nothing. Retrofitting gas or electrical lines through a finished patio costs a full reinstallation. Think about what you might want in five years before you pour the first aggregate lift.
The other advice I give consistently: do not try to fix a bad base with extra bedding sand. I have seen homeowners add two or three inches of sand to compensate for a shallow or uneven base. The result is always the same. The surface looks fine for one season, then the sand migrates and the pavers rock. Grade corrections happen at the aggregate phase or not at all.
— ProZone
Prozoneltd’s professional patio and outdoor construction services in Edmonton
Prozoneltd brings certified project management and Alberta Safety Code compliance to every residential and commercial outdoor construction project in Edmonton and the surrounding region. The team handles full-scope work including excavation, aggregate base preparation, paver installation, and finishing to ICPI standards. For homeowners who want the result without the risk of DIY errors, Prozoneltd’s construction services for Edmonton cover the complete process from site assessment through final compaction.
Prozoneltd also supplies quality aggregate materials directly, so your base meets the depth and density requirements for Alberta’s climate. Request a free estimate through the online form at prozoneltd.ca or call the team directly to discuss your project scope, timeline, and budget.
FAQ
What is the correct excavation depth for a patio in Edmonton?
In Edmonton’s freeze-thaw climate, excavate to accommodate a 6–8 inch compacted aggregate base, plus 1 inch of bedding sand, plus paver thickness. Total excavation typically reaches 9–11 inches below finished grade.
How much slope does a patio need for drainage?
The industry standard is a 1/4-inch drop per foot of patio width, running away from the house. On a 12-foot-wide patio, that equals a 3-inch total drop from house to outer edge.
Can I use regular sand instead of ASTM C33 concrete sand for bedding?
No. ASTM C33 concrete sand has the particle size and angularity needed to resist migration under load. Masonry sand or play sand compacts poorly and shifts under paver weight, causing surface irregularities.
Why do edge restraints fail on DIY patios?
Edge restraints fail when they are anchored into soil rather than a compacted aggregate base. The base must extend 6 inches beyond the paver edge on all sides to give restraint spikes a stable anchor point.
How long does a DIY patio installation take?
A residential paver patio typically takes around two days from excavation through paver laying. Allow an additional 24–72 hours for polymeric sand to cure before regular foot traffic resumes.